NECK & NECK

November 15, 2010

Christmas Workshop: Felt Tree Bottle Covers

Don’t miss this funny christmas Workshop that we have found at Martha Stewart’s Web!!!

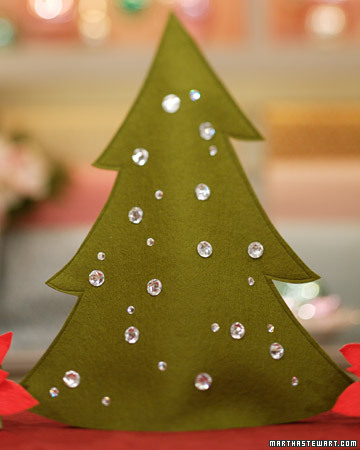
Next time you give a bottle of wine as a gift, dress it up with these lovely felt tree bottle covers.

Tools and Materials
Tree template one or two
1/2 yard (or 2 packs) felt
Pins
Sewing machine and thread
Pencil
Pinking shears or straightedge shears
Decorative embellishments (bells, rhinestones, garland)
Fabri-tac glue
Wine bottle

Bottle Cover How-To
1. Download and print tree template one or two. Pin together two pieces of felt. Place tree template on top of pinned-together felt pieces. Trace tree onto felt.

2. Using sewing machine, sew sides of tree together, leaving the bottom portion open. Then, use pinking shears or straightedge shears to cut tree out of felt.

3. Decorate the felt tree by gluing or sewing on embellishments of your choosing, such as bells, rhinestones, and garland.

4. Place felt tree cover over wine bottle.

October 22, 2010

Halloween Recipes: let’s keep it simple

Orange Jack-o’-Lanterns with Sorbet


Invite a crew of frozen friends for dessert. Cut off the top quarter of an orange. Scoop out flesh with a spoon, then carve eyes, noses, and grins with a utility knife.

Ingredients:

  • 4 navel oranges
  • 2 pints mango, passion-fruit, or orange sorbet, softened


Directions:

  1. Slice off the top quarter of each orange, and reserve for lid. Using a grapefruit spoon or paring knife, scoop or cut out interior of oranges. Reserve flesh for another use, such as fresh orange juice.
  2. Use our templates or draw a jack-o’-lantern face freehand. Tape paper to hollowed orange, and cut out features with a craft knife or other small, sharp knife.
  3. Pack each orange with sorbet, and top it with a “lid.” Bend floral wire, and poke it in — not through — top of orange for tendrils. Transfer to a parchment-lined baking sheet, and place in the freezer until firm, about 30 minutes. Oranges with sorbet can be frozen for up to 3 days.

More Halloween recipes at  Marthastewart.com 

September 28, 2010

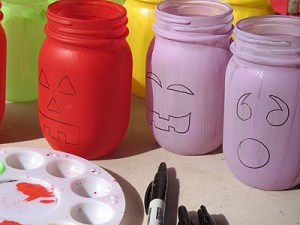
Halloween Painted Jar Luminaries

If you are thinking on how to celebrate this Halloween with your kids, keep an eye to these funny handicrafts. Your children enjoy with the preps!!!

Have a look to these pictures…

Do you like it? Do you want to get the “How to”?  Then , click on the following link!!!  www.craftsbyamanda.com

Love it!!!

July 8, 2010

Summer kids’ handicrafts: sponge ball

And for today NECK & NECK has chosen the most funny kids’ handicraft – play for this summer! It’s about the “sponge ball”!!! Great for a game of tag on a scorching hot day, squishy sponge balls (made from kitchen sponges) are summer’s alternative to snowballs. They also make a family chore like car-washing more fun.

A great idea that we have found on Martha Stewart’s website. Click here to get how to.

June 25, 2010

Crafts for kids: Seashell Koalas!!!

Have a look to this picture!!! Isn’t it adorable and funny?! A Seashell Koalas kid’s craft!


NECK & NECK carries on looking for the most originals ideas and funny crafts for kids. This one we found it out at the Martha Stewart’s website. Click here to see Koala how to.

Enjoy!!

April 30, 2010

To mom, with love!

Looking for a present to give your mum? Don’t miss  Martha Stewart’s website, is full of ideas to give your mum! Here is our NECK & NECK selection, which one do you prefer?!


Special Delivery for Jewelry
Are you giving Mom earrings on her big day? For an unusual presentation, pin them through a beautiful, fresh green leaf that can double as your gift card.
Choose a large, dark variety — one from a hosta (shown), a lily of the valley, or an iris, for example — and write your note with a thin-tipped paint pen in a light color.


Flower-Arranging Gift Kit
Your favorite gardener will appreciate a kit for arranging flowers that she can use again and again. Pack all the essentials inside a jar that’s attractive enough to double as a vase. Include a floral frog to keep stems in place, floral clay to anchor the frog, shears, a floral preservative, and a stem stripper for removing leaves from woody stems.


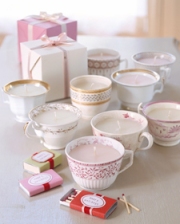
Teacup Lights

Antique teacups that have lost their saucers still make sweet gifts when fitted with candles.
Tools and Materials
Nested pans
Partially burned candles
Candy or candle thermometer
Tongs
New wicking
Teacups
Wick sustainers
Wooden skewers

Teacup Lights How-To
1. In a small pan set over a larger pan of simmering water, melt down old candles; clip the thermometer to the upper pot, and keep temperature at about 185 degrees. Remove old wicks with tongs.

 2. Cut a piece of wicking to the cup’s height plus 2 inches. Clamp one end to a wick sustainer; tie the other end around a skewer. Dip wicking and sustainer into melted wax to coat them. Remove and stick sustainer to cup’s bottom.

 3. Pour in the wax, stopping 1/2 inch below the cup’s rim. Allow wax to set, about 1 hour. The candle will harden with a well in the center. To even it out, use another skewer to prick a circle of holes about 1/16 inch deep around the wick. Pour in melted wax until surface is 1/4 inch below rim. Cut wick.
April 22, 2010

40th anniversary of Earth Day

Today is a special day as its Earth Day 2010. The day is about celebrating the Earth, finding ways of looking after the Earth, and raising awareness of how to protect the environment.

NECK & NECK suggests you: Celebrate the 40th anniversary of Earth Day with your kids. Teach them about how to look after the planet we live on and all kids love coloring in. As they’re enjoying the activity you can talk to them about what they’re coloring and how important it is to be environmentally aware.

Click in the following links to get the templates:

Earth

Tree_flowering

Home tree-house

Planting trees


March 3, 2010

Mommy, I Made it Myself: Mother’s Day Gifts

Mother’s Day gifts should be all about celebrating the wonderful woman who has given you so much, and our NECK & NECK Mother’s Day gift ideas do exactly that. ENJOY!

Brooches
Who needs to show off diamonds when you’ve got heirloom jewels like these?

Materials

Bottle cap
Needle-nose pliers
Pin backing (available at craft stores)
Photo
 White glue or clear glaze (available at craft stores)

To make your pin, use needle-nose pliers to bend out and flatten the rim of a bottle cap. Then your children can glue a pin backing to the cap. Let them decorate the inside edge of the cap- for example with nail polish and glue on glitter. Then they can trace a quarter around a photo of their choice and cut it out.The next step is to glue the picture in the center of the bottle cap and coat it with clear glaze or white glue that dries clear.

Bouquet of Photo Flowers

Looking for a bouquet of flowers that will never wilt or die? Make this precious keepsake for Mom this Mother’s Day and they will cherish it always.


What you’ll need:
Construction paper, various colors
Glue stick
Photos
Scissors
Tape
Green chenille stems, one for each flower
Optional: patterned paper

How to make it:
Cut photos into circles to be used as the center of the flower.  Cut simple flower shapes out of construction paper.  Glue photo circle to the center of the flower. This step is optional: Glue construction paper flower to a piece of patterned paper. Cut around the flower giving your construction paper about a half-inch border of patterned paper. Tape chenille stem to the back of your flower. Make sure the tape is secure by pressing onto the tape with your fingernail.  Trim ends of chenille to the length you desire, depending on what you are using as a vase. If making a handheld bouquet, don’t trim the chenille; simply tie a ribbon bow around them all.

Tips:
Instead of patterned paper, have children color white paper with various colored markers or crayons and use that as your border.  If you find it easier, instead of cutting around the border, trace it lightly first with a pencil, then cut. Even the littlest of children can make this craft, simply help them by cutting out photos and flower ahead of time and have them help with the gluing and taping.

February 23, 2010

Mother’s Day in London

If you’re looking to do something extra special for Mothers Day, London is the ideal place to find that perfect gift for your mum in a million.  From traditional gifts to something a little different, there is a wealth of choice in London for Mothers Day 2010. There’s still plenty of time to go shopping for mum and surprise her with a special Mothers Day gift. See below for our NECK & NECK favourite things to do in London this Mother’s Day.

A night at the theatre
Enjoy a night of theatre at a West End show, with a range of top productions open for booking for Mothers Day.


Put her feet up
No one deserves a break more than a busy mum, and Mothers Day is the perfect opportunity to treat loved ones to some pampering and relaxation.

Say it with flowers
From traditional bouquets to contemporary designs, give your mum some lovely flowers to show her she’s appreciated.


Fine dining
Don’t let the day go by without treating the mothers in your life to a great dining experience in London.

Afternoon tea
There’s nothing more indulgent than treating your mum to the classic afternoon tea in London.


Simply Madonna
If your mum is a fashionista with a soft spot for the boutiques and pop culture history of Carnaby Street, indulge her love of clothing and celebrity at the Carnaby Street exhibition which celebrate 50 years of the stylish shopping district.

January 22, 2010

Have fun with your kids!!

Wet and cold weather it made for a weekend spent mostly inside, so you, parents, are forced to be creative to keep your boys entertained! Here are more NECK & NECK ideas for all of you!


Homemade Puppets
Old socks, mittens,and lunch bags make interesting hand puppets.
Children love to talk through puppets. This gives them the chance to create their own characters. Use markers to make eyes and noses and yarn for hair. The children can even add clothes, a hat, teeth, or ears.

Make a Newspaper

What you need:
several sheets of paper
safety scissors
crayons
construction paper & glue

What you do:
A child can make her own newspaper by drawing or dutting out pictures of events or writing a simple story. The child can mail the newspaper to relatives or friends.

Dress-up
Old hats, shirts, shoes, ribbons, junk jewelry, and other old clothing will occupy a child for hours. Let each child pick out his own costume.

Let’s Play

Preschool children like to play with blocks, trucks, and cars. Often they will make roads for their trucks and cars. Sometimes schools, homes, zoos, and parks appear along the road. Although children may not understand the concept of a map, this is a good time to begin to explain that a map helps people get from one place to another.Maps are all sizes and shapes. They explain a small community, a nation, or the world.
Don’t expect a three- or four-year-old to understand all these concepts, but it’s an introduction to their learning about how to get around the neighborhood and community. Older children may be familiar with the concept of a map. They may want you to explain more and explore more themselves. They may want to go to the library to get a book, like a children’s atlas, and begin activities using it.

Enjoy your weekend!!

Create a free website or blog at WordPress.com.